Project Description
The device is based on Arduino and AVR and was created as a spare-time hack because I got tired of keeping track of many credentials, one day I thought "gee, if only my keyboard could type my passwords for me".
That is what The FinalKey is, a serial-terminal controlled keyboard with one button and encrypted EEPROM storage.
- Technical Overview
- Project Description
- Security
- Building your own
- Required tools
- Required parts
- Putting it together
- Software
- Source Code
- Precompiled firmware
- Software components
- License
- Flashing/Programming
Security
See the security page for more details.
 To the top
Building your own
If you don't want to buy one, that's cool by me, consider donating if you build one, because, that's a thing you can do.
To build one, you need to be able to solder, have a basic knowledge of electronics and Linux or a good knowledge of whatever operating system you use. You also need to be able to read and understand instructions, and go back and read again if there's something you don't understand.
If you have questions or comments about the following, send me a message using the contact form here.
To the top
Required tools
You need tools to do things.
- The hacked arduino-ide, see software
- An ISP programmer supported by the Arduino-IDE (Another Arduino loaded with the Arduino-ISP program works fine).
- Soldering iron (and solder)
- A PC (for programming and using it)
- Hot glue gun (and hot glue)
- Pliers for small wires
Required parts
You don't really need the case, and it's not OpenSource, so... make your own or buy one from me on shapeways.com.

- Short length of insulated, thin single-strand wire, or enamel coated wire
- 1x Arduino pro-micro or compatible board using the ATmega32U4
- 1x 380 ohm resistor for the LED
- 2x 4.7k ohm resistors for the I2C bus
- 1x 6x6x7 mm tact switch
- 1x 24LC512 512 kbit (64 kbyte) I2C Serial EEPROM, they are easiest to use, and cheaper to buy in the DIP package.
- I used the Microchip 24LC512-I/P chips, and they have worked great.
- 1x 3 mm LED
- 1x Arduino Pro Micro case from shapeways
- Tape of some kind, kapton is nice but not required at all.
Putting it together
Flash the bootloader before you do anything else.
In most cases, you should be able to re-flash the bootloader, even after soldering it together,
but check that everything works before you fill it with hotglue!
Steps
- Flash Firmware to Arduino
- Solder EEPROM to Arduino (EEPROM 1 to Arduino A0, EEPROM 5 to Arduino 2)
- Solder 4.7k Ohm pullups to backside of Arduino and EEPROM (Pullups both to Arduino 15 and then 3 and 2 respectively)
- Place LED and switch in case and solder resitor on LED+
- Solder wires on LED and switch
- Solder wires to board (Button to Arduino 7 and 9) (LED resistor to Arduino-VCC, LED- to Arduino 10)
- Fill underneath board with hot-glue
- Add tape on micro-usb connector
- Fill hotglue on top of board
Step 2 Tip 1: Bend the legs on the EEPROM so they line up with the holes before proceeding.
Step 2 Tip 2: Put a dot of super-glue (like SuperAttack) on the Atmega to fix the EEPROM in place before soldering.
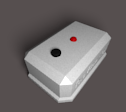
Pictures


Software
Source Code
The source-code is hosted on github, there are three prjects:
DusteDdk/FinalKey - Firmware for the FinalKeys (Atmel ATmega32U4) MCU.
DusteDdk/ArduinoIDE_1.6.3-FinalKey - The modified Arduino IDE used to build the FinalKey firmware, a modified Caterina bootloader was added and the USB HID code was hacked to suit the application, a custom board file was also added.
DusteDdk/FinalKeyGui - The Graphical User Interface, Java, Eclipse project.
Precompiled firmware
The precompiled firmware will not be updated as often as the source-code.
I've put it here in case you're having trouble with compiling it yourself.
The precompiled binary includes the bootloader and a firmware compiled with English PC/Mac and Danish PC/Mac layouts.
firmwre_en_dk_122da1a547e725d1abef7fc545e533e5567a6012.tar.bz2
sha1sum: e875c7e0668b9409deef89028a4624422e62580d
Software components
The following components make up the firmware of The FinalKey.
You don't need to download any of these, they just listed to give an overview of things, and credit where it's due.
- AES - Encryption/Decryption
- Entropy - Hardware Random Number Generation
- I2ceep - Does block-size aligned read/write to the I2C EEPROM
- EncryptedStorage - Storage Format, reads/writes encrypted data using I2ceep and AES
- KeyMaps - Selecting which of multiple available keyboard-layouts should be included in the generated firmware
- The main Arduino sketch handles input/output, presentation of the user-interface via serial
License
- The FinalKey sketch, I2Ceep, EncryptedStorage and KeyMaps copyleft Jimmy Christensen under the GPLv3 or (at your choice) later version.
- All code written by others are copyright by their original authors under whichever license has been chosen.
- All code used in The FinalKey is Public Domain or under Open Source compatible licenses as stated in the source-files or on the websites where they were released.
Flashing/Programming
Before assembling your FinalKey, build and burn the firmware with the custom bootloader so that you can later upgrade the firmware, I consider the default Arduino bootloader to be unsafe for use in a FinalKey as it allows to silently flash the device. The modified bootloader needs both to be unlocked (can only be done when The FinalKey has been unlocked) it also needs the button to be held during power-on to accept firmware-upload.
You need the hacked version of the Arduino-IDE installed, or at least you need to apply the same changes to your Arduino IDE to build the FinalKey firmware.
Before building the FinalKey sketch, take a look in the file "libraries/KeyMaps/KeyMaps.h" and select which three keyboard-layouts you wish to include in the firmware.
In order to flash the FinalKey software, you need an ISP supported by the Arduino IDE, I used another Arduino board flashed with the Arduino-ISP sketch. You need to somehow connect the ISP to the FinalKey board, you decide how to do that, you could maybe get away with using some sort of clamps, but it may be easiest for you to just solder wires onto it for the programming part, and remove them again when it has been done.
Programming pins on the pro-micro
16 = MOSI - Goes to pin 16 on an Arduino-ISP
14 = MISO - Goes to pin 14 on an Arduino-ISP
15 = SCK  - Goes to pin 15 on an Arduino-ISP
RST= REST - Goes to pin10 (or something like that, check the sketch) on an Arduino-ISP

Thunderchilds programming jig on bread-board is a brilliant alternative to soldering.

